Wednesday, December 16, 2009

IIS installation steps on Windows server 2008R2

1. Click Start -> All Programs -> Administrative Tools -> Server Manager.


2. In Server Manager, scroll down to Roles Summary, and then click on Add Roles. The Add Roles Wizard will start with a Before You Begin page. The wizard asks for verification of the following:
a. The administrator account has a strong password.
b. The network settings, such as IP addresses, are configured.
c. The latest security updates from Windows® Update are installed.
3. Select Web Server (IIS) on the Select Server Roles page. An introductory page will open with links for further information.
Note: When you use the Add Roles Wizard to install IIS, you get the default installation, which has a minimum set of role services. If you need additional IIS role services, such as Application Development or Health and Diagnostics, make sure to select the check boxes associated with those features in the Select Role Services page of the wizard.


4. Choose the IIS services to be installed on the Select Role Services page. Add only the modules necessary. In this case, ASP.NET is selected, and a description of ASP.NET appears in the right pane. Once desired modules are added click Next.


5. Add any required role services.


6. IIS is now installed with a default configuration for hosting ASP.NET on Windows Server. Click Close to complete the process.

Sunday, November 15, 2009

Windows Update Error: "0x80240016"

If you get the issue for Windows Update Error: "0x80240016"
Please follow the steps :

http://support.microsoft.com/kb/957307

To resolve this issue, stop and then restart the Windows Update Service. To do this, follow the steps that are appropriate for your operating system.

Windows 2000, Windows XP, and Windows Server 2003
Follow these steps:
1. Close any Windows Update or Microsoft Update browser windows.
2. Click Start, click Run, type cmd, and then click OK.
3. Type the following commands. Press ENTER after each command:
net stop wuauserv
net start wuauserv
4. Close the Command prompt window.
5. Try to install updates again.


Windows Vista and Windows Server 2008
Follow these steps:
1. Close any Windows Update or Microsoft Update browser windows.
2. Click Start , type Command Prompt, in the list of results, right-click Command Prompt, and then click Run as Administrator.
If you are prompted for an administrator password or confirmation, type the password or provide confirmation.
3. Type the following commands. Press ENTER after each command:
net stop wuauserv
net start wuauserv
4. Close the Command prompt window.
5. Try to install updates again.

Want to see the preview of the all the opened program on the task bar as windows not in the text format

If the user come and say that want to see the preview of the all the opened program on the task bar as windows not in the text format ,

Then follow the following steps:

1. Right click on desktop>Personalize> select Aero theme

If this does not help the follow the 2nd steps:

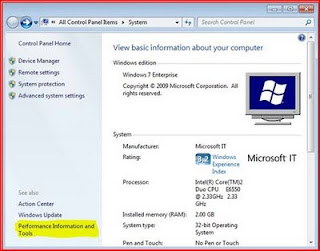
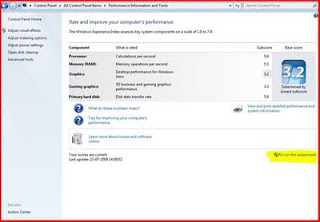
Click Start>Right click computer >Properties >Performance Information and Tools>then run Re-run Assessment


This will resolve the issue

Tuesday, September 22, 2009

Enabling ,disabled Task Mgr and registry

Error: Task Manager has been disabled by your administrator
Click Start, Run and type this command exactly as given below: (better - Copy and paste)
REG add HKCU\Software\Microsoft\Windows\CurrentVersion\Policies\System /v DisableTaskMgr /t REG_DWORD /d 0 /f


Error: Registry has been disabled by your administrator
Go to Run(CTRL + R) and type
"REG add HKCU\Software\Microsoft\Windows\CurrentVersion\Policies\System /v DisableRegistryTools /t REG_DWORD /d 0 /f".

Monday, July 6, 2009

How To: Install Windows 7/Vista From USB Drive

Requirements:
*USB Flash Drive (Minimum 4GB)
*Windows 7 or Vista installation files.
Follow the below steps to create bootable Windows 7/Vista USB drive using which you can install Windows 7/Vista easily.


1. Plug-in your USB flash drive to USB port and move all the contents from USB drive to a safe location on your system.
2. Open Command Prompt with admin rights. Use any of the below methods to open Command Prompt with admin rights.
*Type cmd in Start menu search box and hit Ctrl+ Shift+ Enter.
Or
*Go to Start menu > All programs > Accessories, right click on Command Prompt and select Run as administrator.
3. You need to know about the USB drive a little bit. Type in the following commands in the command prompt:
First type DISKPART and hit enter Next type LIST DISK command and note down the Disk number (ex: Disk 1) of your USB flash drive.
4. Next type all the below commands one by one. Here I assume that your disk drive no is “Disk 1”.If you have Disk 2 as your USB flash drive then use Disk 2.Refer the above step to confirm it.
So below are the commands you need to type and execute one by one:
SELECT DISK 1
CLEAN
CREATE PARTITION PRIMARY
SELECT PARTITION 1
ACTIVE
FORMAT FS=NTFS
(Format process may take few seconds)
ASSIGN
EXIT
Don’t close the command prompt as we need to execute one more command at the next step. Just minimize it.
5. Next insert your Windows7/Vista DVD into the optical drive and check the drive letter of the DVD drive. In this guide I will assume that your DVD drive letter is “D” and USB drive letter is “H” (open my computer to know about it).
6. Maximize the minimized Command Prompt in the 4th step.Type the following command now:
D:CD BOOT and hit enter.Where “D” is your DVD drive letter.
CD BOOT and hit enter to see the below message.
7. Type another command given below to update the USB drive with BOOTMGR compatible code.
BOOTSECT.EXE/NT60 H:Where “H” is your USB drive letter. Once you enter the above command you will see the below message."Bootcode is successfully updated"
8. Copy your Windows 7/Vista DVD contents to the USB flash drive.
9. Your USB drive is ready to boot and install Windows 7/Vista. Only thing you need to change the boot priority at the BIOS to USB from the HDD or CD ROM drive. I won’t explain it as it’s just the matter the changing the boot priority or enabling the USB boot option in the BIOS.
Note: If you are not able to boot after following this guide means you haven’t set the BIOS priority to USB.

Monday, June 1, 2009

Outlook Error

Q. Outlook error message "Outlook could not create the work file. Check the temp environment variable."?

A. The computing "environment" has values that are changeable, or "variable"and can be set for certain needs of different software programs. Thephysical location of temporary storage is one of those environmentvariables. It's identified by TEMP or TMP in the environment variablessettings.

NOTE: Take backup of the registry first by going to start>run>type Regedit>File Export and save the backup on the desktop.

Then go to HKCU\Software\Microsoft\Windows\Current Version\Explorer\User Shell Folders\Cache and check to which location it is pointing to. (e.g:%windir%\temp or something else) then change it to C:\Windows\temp .


This will resolve the issue.

Thursday, May 21, 2009

TO GO TO BIOS

BIOS SUPPLIERS KEYBOARD COMMANDS

ALR Advanced Logic Research, Inc. ® PC / PCI F2

ALR PC non / PCI CTRL+ALT+ESC

AMD® (Advanced Micro Devices, Inc.) BIOS F1

AMI (American Megatrends, Inc.) BIOS DEL

Award™ BIOS CTRL+ALT+ESC

Award BIOS DEL

DTK® (Datatech Enterprises Co.) BIOS ESC

Phoenix™ BIOS CTRL+ALT+ESC

Phoenix BIOS CTRL+ALT+S

Phoenix BIOS CTRL+ALT+INS

Acer® F1, F2, CTRL+ALT+ESC

ARI® CTRL+ALT+ESC, CTRL+ALT+DEL

AST® CTRL+ALT+ESC, CTRL+ALT+DEL

Compaq® 8700 F10
CompUSA® DEL

Cybermax® ESC

Dell® 400 F3, F1

Dell 4400 F12
Dell Dimension® F2 or DEL

Dell Inspiron® F2

Dell Latitude Fn+F1 (while booted)

Dell Latitude F2 (on boot)

Dell Optiplex DEL

Dell Optiplex F2

Dell Precision™ F2

eMachine® DEL

Gateway® 2000 1440 F1
Gateway 2000 Solo™ F2

HP® (Hewlett-Packard) F1, F2 (Laptop, ESC)

IBM® F1

IBM E-pro Laptop F2

IBM PS/2® CTRL+ALT+INS after CTRL+ALT+DEL

IBM Thinkpad® (newer) Windows: Programs-Thinkpad CFG.

Intel® Tangent DEL

Lenova(formally IBM) Lenova BIOS Access page

Micron® F1, F2, Del

Packard Bell® F1, F2, Del

Seanix DEL

Sony® VAIO F2

Sony VAIO F3

Tiger DEL

Toshiba® 335 CDS ESC

Toshiba Protege ESC

Toshiba Satellite 205 CDS F1

Toshiba Tecra F1 or ESC

Thursday, May 14, 2009

Q. I purchased an EAH4650/DI/1GD2 V2 graphics card recently. This card should support HyperMemory function. That means part of the system memory can be allocated to this graphics card. However, according to the ATi control panel, no system memory is allocated to the graphics card. The memory size of this graphics card is still 1GB. This issue occurs under Windows XP only. HyperMemory functions properly under Windows Vista. How do I resolve this issue?

A. This is a software limitation. Windows XP will only support up to 1G of graphics card memory. Since the EAH4650/DI/1GD2 V2 card already has 1GB of onboard memory, Windows XP cannot allocate more system memory to the card. Consequently, it appears that the HyperMemory does not function.


Q. I purchased an Nvidia VGA card with HDMI port. As far as I know, the HDMI port transmits both output audio signal and video signal at the same time. However, there is no any audio signal at all when I connect the HDMI port to my HDTV. How do I resolve this issue?
A. Since Nvidia's VGA cards does not have onboard audio chip, the audio signal must be routed to the VGA card from the motherboard. Please use a SPDIF cable to connect the motherboard's onboard SPDIF interface to the VGA card. Then the HDMI port on the VGA card will be able to output both the audio signal and video signal.


Excel Issue

Q. When you double-click the icon for a Microsoft Excel file (or right-click the icon, and then click Open), Excel starts but the file does not open as expected. However, you are able to open the workbook when you click Open on the File menu in Excel.

A. 1.Click Start, and then click Run.

(WARNING: If you use Registry Editor incorrectly, you may cause serious problems that may require you to reinstall your operating system. Microsoft cannot guarantee that you can solve problems that result from using Registry Editor incorrectly. Use Registry Editor at your own risk. )

2. In the Open box, type regedit, and then click OK.

3. Locate the following registry key:

HKEY_CURRENT_USER\Software\Microsoft\Office\12.0

4. Right-click the Excel key, and then click Rename.

5. Type OldExcel.

6. On the Registry menu, click Exit to quit Registry Editor.

7. Start Excel, and then quit Excel.

8. Double-click the Excel workbook icon (or right-click the Excel workbook icon, and then click Open) to open the file.

9. In the Open With dialog box, click Microsoft Excel for Windows, and then click OK.

Friday, May 8, 2009

Onekey Recovery

Q. I have installed Windows XP SP2 with Onekey Recovery 5.0. When I upgrade it to Windows XP SP3, the system gets black screen after rebooting. How do I resolve this issue?
A. Since Windows XP XP3 is incompatible with Onekey Recovery 5.0. There are two ways to avoid this issue:
1. Use the Windows Update Web site to install the hotfix.
2. Upgrade the Onekey Recovery to version 5.1.
You can refer to Microsoft KB 951618 and KB 950717 for more details.

Q. After I upgrade my VGA card to ASUS ENGTX295 on M3N-H/HDMI, M3N-HD/HDMI , I find that my system sometimes freezes when I play online games. How do I resolve this issue?

A. Please update BIOS to the latest version to resolve this issue.For M3N-H/HDMI, please update BIOS to version 1601 or later to resolve this issue.

For M3N-HD/HDMI, please update BIOS to version 1701 or later to resolve this issue.

Q. I have downloaded the beta drivers for Windows 7 from your download site for P5Q Pro Turbo, P5Q-E, P5Q SE Plus, P6T Deluxe V2, M4A78-EM, P6T, M4A79T Deluxe . As I tried to install the downloaded drivers, Windows 7 does not allow me to install them. How do I resolve this issue?

A. At the moment, the drivers for Windows 7 are beta version. They have not yet passed WHQL verification. Windows 7 does very rigorous checks on driver signature. By default, Windows 7 does not allow non-WHQL driver to be installed. To work around this Windows 7 restriction, please follow the steps below:

1. Press F8 after POST and before the OS loading. If there is any Option ROM, please press F8 after the loading of the Option ROM.

2. When it is done successfully. Please select "Disable Driver Signature Enforcement" to continue booting into Windows 7.

Q. When I follow the steps below on M3N-HT Deluxe, the system always gets black screen.1. Boot into Windows XP.2. Reboot the system by clicking "Start", "Shut down computer" and "Reboot".3. After the reboot, ASUS Express Gate screen will appear. At this time, click "Power" at the bottom right corner of the screen.4. Let the system power down.5. Power on the system again.At this time, there is no display on the screen unless I disconnect the power supply, and then connect it again. How do I resolve this issue?

A. Please upgrade BIOS to version 2302 or later to resolve this issue.

Thursday, May 7, 2009

Change the Name of Your Computer Icon

Launch Regedit and navigate thus:
A) Precaution: Rename the existing value:Locate with regedit HKEY_CLASSES_ROOT\CLSID\ {20D04FE0-3AEA-1069-A2D8-08002B30309D} rename LocalizedString to LocalizedString.Old

1) Create a new VALUE. Note type should be Expanded String Value. Name it: LocalizedString
2) Edit the 'Value data'. Double click LocalizedString, then click in the dialog box and type: %Username% at %Computername%
Incidentally, you could choose more creative words in place of 'at'. For example, 'King of' or 'Queen of'.
3) To see the result, just press F5 to refresh the desktop, your computer icon should now say the equivalent of: YourName at YourComputer.

AutoAdminLogon

1. Launch Regedit. (See more details on starting regedit)

2. Navigate to:HKLM\Software\Microsoft\Windows NT\CurrentVersion\winlogon Set: AutoAdminLogon = 1 (one means on, zero means off)

3. Tip: Try Regedit's 'Find': AutoAdminLogon

4. Create a new String Value called DefaultPasswordSet: DefaultPassword = "P@ssw0rd"

5. Check for the existence of a REG_SZ called DefaultUserName. The value should reflect the user who you wish to logon automatically. If this value does not exist, then right-click in the right pane, New, REG_SZ, name it, DefaultUserName. Set the string value to the required UserName.

6. Optional Item: If your Vista Machine has joined a domain, then create a String Value called DefaultDomainName. Set: DefaultDomainName = "OnlyYouKnowDomain"

NoDriveTypeAutoRun and AutoPlay

One interesting feature of NoDriveTypeAutoRun is that you can set the value in either HKLM** or HKCU.
If you go overboard and configure both, then the Local_Machine over-rides the Current_User.
1. Type 'regedit' in the Start Search dialog box. (See more details on starting regedit)
2. Navigate to this path:
HKEY_LOCAL_MACHINE\Software\Microsoft\Windows\CurrentVersion\Policies\Explorer
3. If necessary create a dword called NoDriveTypeAutoRun
4. Set NoDriveTypeAutoRun = 000000FF A value of 000000FF (decimal 255) disables AutoRun on all drives.
5. Refer to the above table, and use a Hexadecimal calculator to compute the most suitable value for your machine.
6. There is no need to logoff; the NoDriveTypeAutoRun setting should take effect straightaway.

Windows Vista Activation issue

Research indicates that even using the SkipRearm registry hack, you can only use this technique 7 times to delay Windows Vista activation. Additionally, you can use slmgr.vbs -rearm three times, making 10 delays in all.


Preliminary experiment, check the activation expiry date with the command: slmgr -xpr

Launch Regedit. (See more details on starting regedit) Navigate to this path:** HKLM\SOFTWARE \Microsoft\Windows NT\CurrentVersion\SL Double-click SkipRearm and change the value to 1.

Note: this registry hack does not make any sense on a machine which has already been activated!

Now remember to run the 30 day extension command: slmgr -rearmRestart the machine.

After it reboots, run slmgr -xpr and check the expiry date.Check the registry setting SkipRearm, slmgr resets the value to zero.

Friday, May 1, 2009

M4N78

Q.Recently I bought this motherboard to build my new system. When I connect my new SATA hard disk to SATA5 or SATA6 port, this hard drive is not detected in BIOS or Windows. However, BIOS can detect my hard disk successfully when I connect this hard drive to SATA1 ~ SATA3 port. If I changed the SATA mode option from SATA mode to AHCI mode or RAID mode, the hard disk can be detected in BIOS even when I connect the hard drive to SATA5 or SATA6 port. Is it normal?


A.Yes, it is normal. Due to the chipset limitation, the SATA5 and SATA6 does not support SATA mode. These two ports support only RAID mode and AHCI mode. If you would like to use your hard drive in SATA mode, please avoid using SATA5 and SATA6 ports at location indicated in the diagram below.

Friday, April 24, 2009

ASMB4-IKVM

Q .When remote consoling the server with RHEL4 UP7 32bit via the dedicated LAN, the keyboard and mouse can not work in the remote console interface. How do I resolve this issue?

A. This is the RHEL4 UP7 Kernel limitation. Please upgrade the OS to RHEL5 to resolve this issue.

HyperMemory technology

Q.Which ASUS VGA card supports HyperMemory technology?

A .The following products support with HyperMemory technology.
ATI Radeon™ X1300 Series
ATI Radeon™ X1350 Series
ATI Radeon™ X1550 Series
ATI Radeon™ X1600 Series
ATI Radeon™ HD 2400 Series
ATI Radeon™ HD 2600 Series
ATI Radeon™ HD 3400 Series
ATI Radeon™ HD 3600 Series
ATI Radeon™ HD 3800 Series
ATI Radeon™ HD 4800 Series
Please refer to this link for the products supporting HyperMemory technology.
http://www.amd.com/us-en/

M3A78-EM

Q. I recently bought 4G memory to build my new system. After setting UMA Frame Buffer Size to 256M in the BIOS. In the ATI control panel, the display memory Size is 700MB. But in GPU-Z, it shows the memory size as 256MB. Is this normal?

A. Yes, it is normal. The ATI control panel shows 700MB as the display memory size because of AMD Hyper Memory technology. It is a technology through which the GPU can share more system memory as the display memory. When 2G or more memory is plugged in the system, the system will allocate 700MB memory for the GPU. When the UMA Frame Buffer Size is set to 256M in BIOS, 256MB of memory is dedicated for the GPU. The remaining memory (257MB ~ 700MB) is dynamically allocated to the GPU or the system on need basis. Your version of GPU-Z does not take AMD Hyper Memory into account. Hence it merely displays 256MB of dedicated system memory as the display memory.

Rampage II Extreme

Q .I have enabled the Load Line Calibration in the BIOS. But I find that this function is disabled automatically after system resumes from S3. How do I resolve this issue?

A .Please upgrade BIOS to version 1306 or later to resolve this issue.
http://support.asus.com/download/download.aspx?SLanguage=en-us&model=Rampage%20II%20Extreme&type=bios

P5Q-EM

Q .Why does the temperature of this motherboard appear higher than many others? Considering this motherboard does not seem to be hotter than the others, there must be a special reason behind this. Please explain why this motherboard has been designed in this way, and what can be done to lower the motherboard temperature reading on this motherboard.

A .This motherboard have been specially designed to express the importance of temperature management of the memory VRM (Voltage Regulator Module, or often called power circuit), as the cooling of memory VRM are often ignored or unnoticed by many users, though it is the key to overall memory stability. Due to this reason, the motherboard temperature sensor has been placed right next to the VRM circuit, allowing the motherboard to reflect the rise and fall of memory VRM temperature at real time. In order to lower the temperature, we strongly recommend all users to ensure there is sufficient airflow passing through the memory VRM. This can be achieved via the following ways:1. The rearrangement of cables inside your chassis, to ensure there is no blockage to stop cold air from entering memory VRM zone.2. The use of CPU fan which brings sufficient airflow to its surrounding. (Higher fan spin may be required depending on the use of CPU fans.)3. Add extra fan to blow onto memory VRM directly.Note: The effect of above suggestions can be verified by monitoring the effect to the motherboard temperature reading under [Hardware Monitor] inside CMOS Setup screen, or via Pc ProbeII or AI Suite under Windows platform.
Due to their special design, the recommended motherboard temperature is also a little different to other motherboards not adopting such design. If PC Probe II report warning message of motherboard temperature, it is recommended to maintain your motherboard temperature of these three motherboards between 0 to 65 degrees Celsius to ensure overall stability of your system.

Crosshair II Formula

Q . I upgraded AI Suite utility to 1.05.12 or later version. However, I find that AI Suite does not work any more. After I press the "CPU Level Up" button, AI Suite control panel minimizes itself automatically, and it is unable to be opened again. Everything works fine when downgrading AI Suite to version 1.03.29. How do I resolve this issue?

A .Please update BIOS to version 1502 or later to resolve this issue. http://support.asus.com/download/download.aspx?SLanguage=en-us&model=Crosshair%20II%20Formula&type=bios

How to Play .M2TS files

Playing M2TS files from AVCHD folders (BDMV and CERTIFICATE) can be achieved with some commercial software including Corel WinDVD 9 and CyberLink PowerDVD Ultra.

This is probably the safest method for playback, as these two software items are literally built for playing High-definition video content, particularly Blu-ray and AVCHD.

These software items are not free, they are both commercial solutions and are built to play movies from discs with compatible drives, therefore buying either item without a Blu-ray or HD DVD disc drive is probably a waste of money.

The other possible options below:
VLC Media Player could play back the content (as it supports H.264 video and AC3 audio directly without needing DirectShow filters), but it did run into some problems with several M2TS files.

Blu-ray players and the Sony PlayStation 3 (PS3) console support playing AVCHD files, and the at least the PS3 supports playing M2TS files directly without authoring to AVCHD first.

For an editor: Pinnacle does it well. They're using VC-1, support 5.1 audio and also have 60p profiles. You can create your own PRX file if you don't like the ones they have in there.

If you just want to transcode your files, there's a new option if you have right DShow codecs on your PC: Microsoft Expression Encoder 2 . They have a trial version.

To make it work, you'll need to have three filters:-
A TS splitter that supports AVCHD (Haali works, or use the one that comes with Sony's PMB)

A H.264 decoder (Sony's PMB uses half-res, but it's free; CoreAVC will work here too)

A AC-3 decoder (AC3Filter works)

If you're only looking for conversion, try this:
http://www.nchsoftware.com/prism/plus.html
You can download a demo that does everything for a few days for free. When you add a .mts file to it, it'll say something like "format might not be supported", but it'll do the conversion anyway. I think it just doesn't recognize the extension, but it supports h.264/avchd.

Wednesday, April 22, 2009

How to install and uninstall IPv6

To install IPv6:-
Start, point to All Programs, point to Accessories, and then click Command Prompt.At the command prompt, type: ipv6 install and press the Enter Key.

To uninstall IPv6:-
Start, point to All Programs, point to Accessories, and then click Command Prompt.At the command prompt, type:netsh int ipv6 uninstall and press the Enter Key.
Restart the computer.
To disable IPv6 in Vista:
1.Click Start, click Control Panel, and then double-click Network Connections.

2.Right-click any local area connection, and then click Properties.

3.Click Microsoft TCP/IP version 6 (for Windows XP with SP2 or later or Windows Server 2003) or Microsoft IPv6 Developer Edition (for Windows XP with SP1), and then click Uninstall.

4.When prompted to confirm the removal of the Microsoft IPv6 Developer Edition or Microsoft TCP/IP version 6 protocol,
click OK.

Tuesday, April 21, 2009

Disable Internet Explorer Enhanced Security Configuration (IE ESC) for Windows 2008

IE Enhanced Security Configuration setting is resided in Server Manager.

After you launch server manager, at the right pane Server Summary page,

under the Security Information panel,

click on the Configure IE ESC link.

After that, a windows will prompt out as below:


Just edit the necessary setting and click on OK. Restart your IE browser, you will find all the security warning is missing, if you go to Internet Options -> Security tab, you will be able to tweak the security level for Internet zone. Last but not lease, please remain the original IE security settings for your production server. This is always the best recommendation from Microsoft.

yellow and dark images in windows photo gallery

1.Go to Vista's Control Panel > Hardware and Sound, open Color Management

2.select the Use my settings for this device checkbox.

3.Remove existing profile. (Select it and click Remove button)

4.Click the Add… button

5.Select sRGB IEC61966-2.1 ICC profile and click OK

6.Click the Set as Default Profile button"

Unable to Start Windows Firewall

Open Registry Editor (Start->Run->regedit).
1.Navigate toHKLM\System\CurrentControlSet\Sevices\SharedAccess \Parameters\FirewallPolicy\FirewallRules.
2. Take a backup of these registry entries.
3. Delete the rules in the left pane Press Delete.
4. Start Services MMC (Start->Run->Services.msc). Select "WindowsFirewall" ->Right Click->Start. Firewall service should start now.
To restore the default set of rules:
1.click on Start->Type WindowsFirewall in the search box. Click on "Windows Firewall"
2.Click on "Allow a program through Windows Firewall". Click onAdvanced Tab->Restore Defaults.

Unable to open Hyperlink from Outlook

Unable to open Hyperlink from Outlook

1. Click start> Run > type "regsvr32 Urlmon.dll" (without Quote)

2. reset IE

3. Start, click Run, type Regedit in the Open box, and then click OK.

Browse to HKEY_CURRENT_USER\Software\Classes\.html

Right click the value for the .html key
Select Modify Change the value from "ChromeHTML" to "htmlfile" (or
from FireFoxHTML to htmlfile)

Monday, April 20, 2009

TrustedInstaller.exe utilizing about 100% of cpu

TrustedInstaller.exe is used by the windows service called "Windows Module Installer" (Or rather is the service) Says it has something to do with updating windows, so uninstalling or disabling it could cause some updates to fail. Please set the service to start manualy.
1. Start Menu ->Run2. type msconfig and select Services section.3. delect the box next to Windows Module Installer
this will keep it from starting up when loading windows
Now to set it to manual start
1. Right click taskbar and select properties
2. Select Start Menu tab and choose Customise..." button
3. In the list, check "Display administrative tools" and click apply and click ok
4. Now go to Start Menu -> Program Files -> Administrative tools -> Services
5. Look in the list for the service "Windows Module Installer"
6. Double click and look for the dropdown menu, this will be on the "General" tab
7. Select "Manual" from the list
8. Click apply, click ok
9. Now restart
Everything should be good now .You need to turn it off in the processes from task manager

svchost.exe -- application error the instruction at "0x745f2780" reference memory at "0x00000000". the memory could not be 'read'

Event log yielded the following:
Faulting application svchost.exe, version 5.1.2600.2180, faulting module msi.dll, version 3.1.4000.2435, fault address 0x00012780.
Repair Steps:
Verify Windows Update and BITS Service settings:
1.Click Start->Run, type "services.msc" (without quotation marks) in the open box and click OK.

2.Double click the service "Automatic Updates".

3.Click on the Log On tab, please ensure the option "Local System account" is selected and the option "Allow service to interact with desktop" is unchecked. Check if this service has been enabled on the listed Hardware Profile. If not, please click the Enable button to enable it.

4.Click on the tab "General "; make sure the "Startup Type" is "Automatic". Then please click the button "Start" under "Service Status" to start the service. Repeat the above steps with the other service: Background Intelligent Transfer Service (BITS)
Re-Register the Windows Update DLLs << run the Batch file “SVCHostERR.bat” – or manually perform steps in this section.
Click on Start and then click Run, type: cmd and click OK.

In the command window type "REGSVR32 WUAPI.DLL" (without quotation marks) and press Enter.When you receive the "DllRegisterServer in WUAPI.DLL succeeded" message, click OK.
Please repeat these steps for each of the following commands:
REGSVR32 WUAUENG.DLL
REGSVR32 WUAUENG1.DLL
REGSVR32 ATL.DLL
REGSVR32 WUCLTUI.DLL
REGSVR32 WUPS.DLL
REGSVR32 WUPS2.DLL
REGSVR32 WUWEB.DLL
Next stop the windows update Service by typing: “net stop WuAuServ”Rename the Windows Update folder: Click Start, Run, type: %windir% and press Enter.In the opened folder, rename the folder SoftwareDistribution to SD_Old.Restart the Windows Update Service. Click Start, Run, net start WuAuServ.
Reboot system

How to Disable the Content Advisor Password in Internet Explorer

The following are steps you can take to disable the content advisor:
Click on Start and choose Run. Type in RegEdit and select OK.

Click the plus sign for H_KEY_LOCAL_MACHINE Continue down through:+H_KEY_LOCAL_MACHINE +Software +Microsoft +Windows +CurrentVersion +Policies

Click on the Ratings folder.

In the right pane of the RegEdit window, you'll see an icon called Key.

Click on it and press Delete.

Exit the registry editor

Restart the computer and run Internet Explorer again.

Choose Tools, then Internet Options (View > Options in IE 4 and below) Click on the Content (Security in IE 4 and below) tab and if the 'Enable/Disable' button still says Disable, click on it. When asked for a password, just enter a null (blank) password.

error code 80073712

Thank you thank you thank you. Deleting pending.xml did the trick!
> 80073712 - ERROR_SXS_COMPONENT_STORE_CORRUPT.> Windows Update file corruption.> > Delete the file pending.xml under C:\windows\winsxs> > and/or> > > Reinstall the Windows Update Agent> > Windows, x86-based systems>
http://download.windowsupdate.com/WindowsUpdate/redist/standalone/7.0.6000.381/WindowsUpdat
eAgent30-x86.exe> > Windows, x64-based systems>
http://download.windowsupdate.com/WindowsUpdate/redist/standalone/7.0.6000.381/WindowsUpdat
eAgent30-x64.exe

At the command prompt, type the following command, and then press ENTER:
reg delete HKLM\COMPONENTS /v StoreDirty

Error: 0x80072f8f

What causes Error 0x80072f8f
# The date / time on your computer is too different from the date / time of the SSL (Secure Sockets Layer) certificates used by the Windows Update site..
To resolve this error, use one of the following methods:
Resolution Suggestion One:
# Check you have the correct time and date and time zone:
1. Double click the clock in the bottom right hand corner. 2. Check you have the correct time and date. 3. Click the Time Zone Tab. 4. Check you have the correct time zone.
Resolution Suggestion Two:
# Re-register these important files and check IE settings:
1. Click Start. 2. Choose Run. 3. In the Run box, type: regsvr32 Mssip32.dll 4. Click OK. 5. Repeat this time typing: regsvr32 Initpki.dll
...now
6. Open Internet Explorer7. Select the Tools menu and then select Internet Options8. Choose the Advance tab 9. Unselect 'check for server certificate revocation' reboot PC and test again!

Error: 0xC00000EA - An error occurred

This is what worked in my case:
Go to the properties of the external hard driveUncheck the "Compress this drive to save space"Depending on the size of the drive and the files on it, it may takesome timeRestart and attempt another full back up
In my case it worked when all previous attempts failed with thatcryptic error code: 0xC00000EA. Apparently, Vista has a problem backingup data to a compressed drive.


Error: 0xC00000EA - An error occurred. The following information might help you resolve the error:
If an MM error is returned which is not defined in the standard FsRtl filter, it is converted to one of the following errors which is guaranteed to be in the filter. In this case information is lose, however, the filter correctly handles the exception. This error occurred on computers running eTrust antivirus software. Excluding zip files from being scanned or disabling eTrust solves the problem. Contact CA, the antivirus vendor, for an updated version.

Desktop background wallpaper pictures is not working just the solid colors

Desktop background wallpaper pictures is not working just the solid colors
Resolution:
Go to Control Panel (Classic view) > Ease of Access Center > Make the computer easierto see link, Uncheck Remove background images (where available) -- at the bottom of the window

cannoy copy to Y shared drive on vista

1. Open Schedule tasks under Administrative Tools 2. Right click in 'Task Scheduler' and select 'Create task...'3. Name: {Any Name} User Account: Click 'Change user or group' and type SYSTEM in the text box, clicking OK.4. In Actions, Click New.5. In 'Program/script', type: c:\windows\system32\cmd.exe6. In 'Add Arguments', type: /crd c:\Windows\CSC /s /q7. Click 'OK'8. Click 'Task Scheduler Library' to be able to see the created task 9. Right click in that task and select 'Run'.10. Restart machine.

browse through your pictures using the thumbnails view in Windows

This is a simple way to enlarge them as you wish:
1. Go to Start, Run
2. Type in the command box: regedit
3. Double click on HKEY_CURRENT_USER
4. Double click on Software
5. Double click on Microsoft
6. Double click on Windows
7. Double click on CurrentVersion
8. Double click on Explorer
9. Right click in the right side window (somewhere on an empty space)
10. Select New, then DWORD value
11. Rename the new value ThumbnailSize
12. Double click on it
13. In the opened menu, select Decimal in the Base field
14. Set the value in the small box to 255.
15. Click OK and enjoy your giant-sized thumbnails

Thursday, April 16, 2009

Z8PE-D18

Q .I have installed VMWare ESX4.0 successfully. When I reboot my system, an error message, "Initialization for ipmi_si_drv failed with -19", would pop up. How do I resolve this issue?

A.This error message would appear when there is no IPMI card detected. If you would like to avoid this error message, please install an ASMB4-IKVM card on this motherboard.

M4A78-E

Q..I’ve installed an USB printer on my motherboard. After I installed the printer driver, the printer can be detected successfully. But when I tried to print from Microsoft Word, nothing got printed. There’s no error message reported in Windows. I have also updated to BIOS version 0711, and re-installed all the necessary drivers, but the situation is still the same. How do I resolve this issue?

A.Please install the USB filter driver to version 1.0.10 or later to resolve this issue.: http://support.asus.com/download/download.aspx?SLanguage=en-us&model=M4A78-E

M4A78-HTPC

Q.I purchased this motherboard to build my new system. After installing OS and motherboard drivers, I find that the CPU fan is noisy even under Tranquil mode. I am using a 3-pin CPU fan. How do I resolve this issue?

A.The default fan control in BIOS is "PWM Fan" mode. If you use 3-pin CPU fan, please go to BIOS setup -> Power -> Hardware Monitor -> Select Fan Type, and set the value "Select Fan Type" from "PWM Fan" to "DC Fan" in the BIOS setup. When using 3-pin CPU fan with "PWM fan" mode, the CPU fan would not function properly. Please make sure your BIOS setting is changed to ensure proper fan control on your 3-pin CPU fan.

How to select power supply

Q .I purchased a new graphics card recently. I would like to upgrade the power supply. However, I would like your recommendation on the selection of the power supply. Where do I get more information?

A.For finding an appropriate power supply, please use our recommended power wattage calculator on our official support site:http://support.asus.com/PowerSupplyCalculator/PSCalculator.aspx?SLanguage=en-us

P5Q-EM DO

Q. How do I use the IT Director function?

A.Please press "Ctrl+P" to enter Intel Standard Management ability configuration after POST. Then you can see SOL/IDE-R setting. After enabling this setting, you will be able to use IT Director function.

SLI function

Q.I purchase new ASUS graphics cards recently. I would like to use SLI function. Would you please tell me how to build SLI platform?

A..Nowadays, there are several ways to build SLI platform, such as 2-way SLI, 3-way SLI, Quad SLI, and Hybrid SLI. Take 2-way SLI for an example, despite of the SLI capable graphics cards, you need an SLI-Certified motherboard with two physical PCI Express x16 slots. NVIDIA lists the Certified GPU on their official website base on GPU series and motherboard chipset as well.Please refer to the link to find more detail:
For 2-way SLI, 3-way SLI, Quad SLI, please refer to this link:http://www.slizone.com/page/slizone_learn.html
For Hybrid SLI, please refer to this link:http://www.nvidia.com/object/hybrid_sli_desktop.html

ASUS BIOS Update

New BIOS Information
P5KPL-AM/PS
Release BIOS 0506, 04/06/2009 [http://support.asus.com/download/download.aspx?SLanguage=en-us&model=P5KPL-AM/PS&type=bios]
Enhance compatibility with certain 533MHz FSB CPU.
P5QL-EM
Release BIOS 0506, 03/26/2009

Fix there might be unable to install OS when APIC mode is disabled.
M2N68-AM SE2
Release BIOS 0502, 03/28/2009

Add support to flash back to older version of BIOS.
M2N68-AM PLUS
Release BIOS 0502, 03/28/2009
2. Add support to flash back to older version of BIOS.
M2N68 PLUS
Release BIOS 0502, 03/28/2009
2. Add support to flash back to older version of BIOS.
M2N68-AM SE
Release BIOS 0504, 03/28/2009
2. Add support to flash back to older version of BIOS.3. Fix there might be white stripes on the screen when playing movies after enabling CIE in the BIOS setup.
Rampage II Gene
Release BIOS 0705, 04/09/2009
Fix it may take a while to enter BIOS setup when setting CPU ratio over standard ratio.
M3N78-VM
Release BIOS 1006, 03/26/2009
2. Add support to flash back to older version of BIOS.
M3N78 SE
Release BIOS 0702, 03/28/
2. Add support to flash back to older version of BIOS.
M4N78 PRO
Release BIOS 0615, 03/26/2009

M3N-HT Deluxe
Release BIOS 2101, 03/30/2009

M3N78 PRO
Release BIOS 0801, 03/27/2009

M3N78-EM
Release BIOS 0520, 04/06/2009

M3N-H HDMI
Release BIOS 1501, 03/27/2009

M3N72-D
Release BIOS 0701, 03/27/2009

M3A32-MVP Deluxe
Release BIOS 1604, 03/31/2009 1. Fix the memory frequency may be limited at 800MHz when setting the value of "Memory Clock Mode" to "Limit" or "1067" in the BIOS setup.2. Set the value of "Processor Frequency Multiplier" option up to 35 in the BIOS for certain AM2+ CPU.
M3A32-MVP Deluxe/WiFi-AP
Release BIOS 1604, 03/31/2009
1. Fix the memory frequency may be limited at 800MHz when setting the value of "Memory Clock Mode" to "Limit" or "1067" in the BIOS setup.2. Set the value of "Processor Frequency Multiplier" option up to 35 in the BIOS for certain AM2+ CPU.

M3A78 PRO
Release BIOS 0902, 03/31/2009
1. Fix the memory frequency may be limited at 800MHz when setting the value of "Memory Clock Mode" to "Limit" or "1067" in the BIOS setup.

M3A-H/HDMI
Release BIOS 1402, 03/31/2009
1. Fix the memory frequency may be limited at 800MHz when setting the value of "Memory Clock Mode" to "Limit" or "1067" in the BIOS setup.2.

M3A78-T
Release BIOS 0903, 04/01/2009
1. Fix the memory frequency may be limited at 800MHz when setting the value of "Memory Clock Mode" to "Limit" or "1067" in the BIOS setup.2. Enable ACC option for AM2+ and AM3 CPUs. 4. M4A78 PRO
Release BIOS 0902, 03/26/2009

http://support.asus.com/technicaldocuments/technicaldocuments.aspx?root=198&SLanguage=en-us

http://support.asus.com/cpusupport/cpusupport.aspx?SLanguage=en-us&model=M2N68-AM%20SE2