Creating your HomeGroup
Click the Start button or press the Windows key.
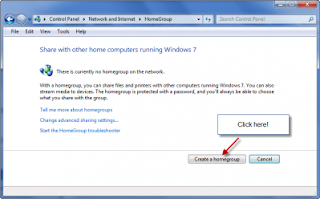
Start Menu > Control Panel > Select Network and Internet, Choose “Homegroup and Sharing Options.” > click the button labelled, Create a Homegroup.

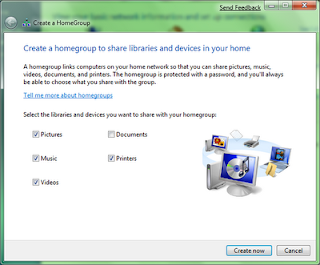
The “Create a Homegroup” window opens, displaying the features you can share – Pictures, Documents, Music, Printers and Videos.Check the boxes for those items you wish to share.Click the Next button.

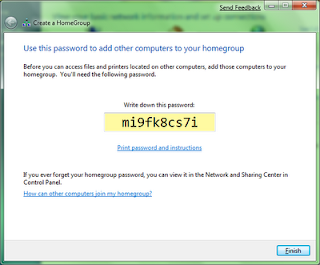
The wizard then generates a password which can be used to add other computers to your HomeGroup

Click Print password and instructions.
Give the Password information sheet to the other computer user(s).
Click the Finish button.
Your new HomeGroup is now created and your Pictures, Music, Videos, Printers folders are ready to be shared with other computers when they join this HomeGroup. These folders - Music, Videos, Printers, Pictures - are called as your Libraries in Windows 7.
Joining HomeGroup
Click the Start button.
When the Start Menu opens, Homegroup.
The Change Homegroup settings window opens indicating that another computer is on the Homegroup network. It also shows that there are shared Libraries and Printers.
Click the Join now button.

The Join a Homegroup window opens. You need the Homegroup Password to join.

Type in the Homegroup Password.
Click the Next button
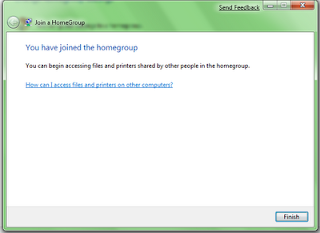
Windows 7 informs you that you Welcome to your HomeGroup!

Click the Finish button.
Viewing your HomeGroup
Click the Start menu.
Select Homegroup.

The Homegroup window opens.
Click Homegroup
HomeGroup was certainly designed for ease and it does stay true to its promise - An easy end-to-end approach to sharing in your Home!
